Background

Pages

Saturday, October 8, 2011

What I LOVE About Fall/Halloween Blog Hop ~ Day 2

Welcome to the What I Love About Fall/Halloween Blog Hop ~ Day 2! This hop is scheduled from Oct. 7 at 8:00am through Oct. 8 at 11:00pm CST.

If you just happened to drop by my blog today, you can start at the beginning with Lisa's Blog. If you just came from Vicki's Blog, then you are in the right spot!

We're so excited to be doing this hop and we have a fabulous lineup with some very talented ladies. There will be lots of fun projects, along with some great blog candy, and a great Grand Prize for this hop.

The hop is a 2 day hop so you will have plenty of time to make it through the whole hop lineup twice. Check out each blog and see what blog candy you can win at the individual stops. Please come back both days to see great projects.

For today's project I made this super cute paper pumpkin! I saw the recipe on The Kraft Journal Blog and she picked up the original instructions from Archivers! When I saw it I knew I had to make one too...


Isn't it the cutest? The rosettes are pretty easy to make. You simply cut your Bazzill cardstock (from Michaels Crafts) strips to size, score them every 1/2" with the Martha Stewart Score Board (also found at Michaels), and then accordion fold your score lines. Then you adhere them together end to end with Scor Tape (love it because you can tear it rather than cut it). Then flatten them and kind of squeeze them into a circle shape. Then you glue a 1 1/2" circle to each side using a hot glue gun. It takes a little practice but once you've made a couple it goes pretty quickly. You need 8 sheets of orange cardstock, 1 sheet of Kraft cardstock and any inks and embellishments you want to use!


So here's the measurements for any of you who are interested in making one of your own:
Top Rosette: 2 strips at 1 1/2" x 12"
2nd Rosette: 3 strips at 2 3/4" x 12"
3nd Rosette: 3 strips at 3" x 12"
4th Rosette: 3 strips at 3 1/4" x 12"
5th Rosette: 3 strips at 3 1/4" x 12"
6th Rosette: 3 strips at 3 1/2" x 12"
7th Rosette: 3 strips at 3 1/4" x 12"
8th Rosette: 3 strips at 3 1/4" x 12"
9th Rosette: 3 strips at 2 1/2" x 12"
Last Rosette: 2 strips at 1 3/4" x 12"

Stem: 3 strips at 1 1/2" x 12" fringed - you can make this taller or shorter depending on your preference. I used the Martha Stewart Fringing Scissors and it made this job really quick! I was originally going to add glitter to this one but decided to make another in black in a few days (when my hands have recovered from all the scoring and folding) and glitter-fy that one...


Here is the complete lineup:

Lisa's Blog
Lisa P's Blog
Kristy's Blog
April's Blog
Jamie's Blog
Anita's Blog
Sher B.'s Blog
Amy's Blog
Gina's Blog
Dena's Blog
Melinda's Blog
Shannon's Blog
Janet's Blog
Tammy's Blog
Barbara's Blog
Christina's Blog
Kari's Blog
Theresa's Blog
Vicki's Blog
Mandie's Blog - You are HERE
Suzanne's Blog
Jearise's Blog

To be eligible for the grand prize, you must visit each blog and leave a comment at each stop. Also if you have a Facebook account, please go "Like" Scrapping With Lisa"s Facebook Page HERE. Besides the Grand Prize that Lisa mentioned at the beginning of the hop you can also win a fun Goodie Bag on my page to! Make sure you leave me a comment both days and I will choose one winner each day!

Your next stop is Suzanne's Blog! Go see what awesome project she has in store for you after you leave your comment here!

Have a great day and please stop back tomorrow for another great project!

Friday, October 7, 2011

What I LOVE About Fall/Halloween Blog Hop ~ Day 1

Welcome to the What I Love About Fall/Halloween Blog Hop. This hop is scheduled from Oct. 7 at 8:00am through Oct. 8 at 11:00pm CST.

If you just happened to drop by my blog today, you can start at the beginning with Lisa's Blog. If you just came from Vicki's Blog, then you are in the right spot!

We're so excited to be doing this hop and we have a fabulous lineup with some very talented ladies. There will be lots of fun projects, along with some great blog candy, and a great Grand Prize for this hop.

The hop is a 2 day hop so you will have plenty of time to make it through the whole hop lineup twice. Check out each blog and see what blog candy you can win at the individual stops. Please come back both days to see great projects.


For the hop I have created this picture frame from some scraps I had left of Echo Park Apothecary Emporium. I created a Paper Bag Album using the 6" x 6" paper pad that you can see HERE. So I had a lot of odd shaped scraps and I decided that I would make a patchwork frame by Mod Podge-ing them to my frame. I painted the edges with black acrylic paint before I adhered all my pieces. Then I inked around the edges of the whole frame to distress it a bit. Finally I added my floral embellishment because things just don't feel "finished" to me without flowers, buttons and/or ribbon!

Here is the complete lineup:

Lisa's Blog
Lisa P's Blog
Kristy's Blog
April's Blog
Jamie's Blog
Anita's Blog
Sher B.'s Blog
Amy's Blog
Gina's Blog
Dena's Blog
Melinda's Blog
Shannon's Blog
Janet's Blog
Tammy's Blog
Barbara's Blog
Christina's Blog
Kari's Blog
Theresa's Blog
Vicki's Blog
Mandie's Blog - You are HERE
Suzanne's Blog
Jearise's Blog

To be eligible for the grand prize, you must visit each blog and leave a comment at each stop. Also if you have a Facebook account, please go "Like" Scrapping With Lisa"s Facebook Page HERE. Besides the Grand Prize that Lisa mentioned at the beginning of the hop you can also win a fun Goodie Bag on my page to! Make sure you leave me a comment both days and I will choose one winner each day!

Your next stop is Suzanne's Blog! Go see what awesome project she has in store for you after you leave your comment here!

Have a great day and please stop back tomorrow for another great project!

Saturday, October 1, 2011

Operation Write Home Blog Hop!

I'm so honored to be a part of this AMAZING blog hop for Operation Write Home! I wanted to keep my card fairly simple so it is easy to make in larger quantities, but I also wanted to make it beautiful! So, I pulled out my Graphic 45 Christmas Emporium papers and made this simply beautiful card:


I added a tiny bit of sparkle with a couple of Spica Pens, which is embedded glitter that will not flake off. We don't want to accidentally endanger our troops! It's hard to see in the photo but in person this card shines. Thanks for checking out my card today! You can hop to the next blog in the line-up by clicking on the link below:

Tuesday, September 27, 2011

An Oldie but Goodie and a Winner!

I just wanted to say a big "THANK YOU" to all of you who hopped along our Echo Park Paper Blog Hop over the weekend! I hope that we inspired you to play with your paper too. Remember, Kim has lots of beautiful Echo Park Paper for sale in the Cutters Creek online store. You can click HERE to buy some of your favorites!


This "BOO" sign is one that I created last Halloween with the Echo Park Happy Halloween line. I bought the wood letters at JoAnne Fabrics and painted them black. Then I Mod Podged the letters with some of my favorite sheets of the patterned paper. I really wish the D'Stress tool was out then, it would have been handy for sanding the edges! Then I used my Cricut and the Happy Hauntings cartridge to cut a variety of shapes, as well as the stickers from the collection kit to decorate the letters. Then I added the ribbon to hang it and promptly hung it by my front door. I'm looking forward to pulling this out of the box again this year!

You could easily create a beautiful sign for your home with any of the great Echo Park Paper Collection Kits that are available in the Cutters Creek store! I'm thinking that I want to use either the Season's Greetings or Holly Jolly Kit to create something special for Christmas...

Now, I bet you are wondering WHO my blog winner is....

I used random.org to select my winner and it decided that this one looked like a good number....


And that person is...


Congrats, Joni! I will be emailing you shortly for your information. Thanks again to all of you that hopped and welcome to my new followers!

Monday, September 26, 2011

Brew Crew Layout with Echo Park Paper

Today I have a layout that I created using my FAVORITE Echo Park Paper Collection - Happy Days! I am in love with the vintage flavor that these papers have.


I started with a Kraft Cardstock base and used 5" x 5" squares of the Happy Days paper for my background. Then I simply mounted all of my photos (2 - 4" x 5", 1 = 4" x 6") to a couple of cardstock strips and lined them up on my paper. (Note - the only change I would have made would have been to not line this up right in the middle, I had to cut my daughters face in the photo). I used my Pink ATG to adhere every thing. Then I cut the title "Brew Crew" from the Nifty Fifties Cricut Cartridge and ran the letters through my Xyron 150 to add the adhesive. It's a quick and easy way to add your adhesive and there's no mess! I used the stickers in the Happy Days kit to spell out my other words and then added a few embellishments from my stash with Glue Dots. Finally I added my journaling with the Inkssentials White Pen. I'm really happy with how this layout turned out, but Echo Park's gorgeous papers make it easy to create works of art!

Friday, September 23, 2011

Cutters Creek Echo Park Blog Hop!

Welcome to stop #2 on the Cutters Creek Echo Park Blog Hop! You should have come here from the Cutters Creek Design Team Blog, if not you can pop over there to start at the beginning. Today I used one of my favorite Echo Park Paper collections, Apothecary Emporium. I used the 6 x 6 Paper Pad because I like the smaller scale of the patterns for my little book.


I put together a basic paper bag album and used my Pink ATG and Scor Tape to assemble it. I always make sure to use a good quality adhesive so that my creation will last a long time!


I used my Cricut and the Happy Halloween cartridge to cut a variety of spooky shapes to decorate my album.


For these pages, I added Glossy Accents to the tree on the patterned paper to really make it pop! For the Spider, I actually covered him with Glossy Accents and sprinkled Black Flocking Powder over it while it was wet. I made sure I used my Bazzill Splat Mat under it so it wouldn't stick to anything while it dried. Once it dried, I added googly eyes with a dot of Glossy Accents.


To get the bit of orange on the left side page I masked off a section and sprayed a couple of Glimmer Mist colors to get just the right orange-y color since I didn't have just the right color on hand. I also used it all over the small piece of paper on the center flap because I really wanted more orange in my book. It's a great way to alter papers and add a bit of sparkle!


I also used a lot of Black Soot Distress Ink on my book too. I distressed the edges of just about everything I added!


There are large tags throughout the book in the pockets of the pages but I decided to add one more at the end. I cut the tombstone shape from the Happy Hauntings Cricut Cartridge and also the skeleton. I used the Inkssentials White Gel Pen and a Sakura Stardust Pure Glitter Pen to accent my tag as well.


For the back of the album I cut the phrases from the Happy Hauntings Cricut Cartridge from Glossy White Cardstock. I used the same Glimmer Mist combination to spray it orange so I have sparkle and shine!

I had so much fun creating this book, I can't WAIT to make another! Make sure you are following my blog and leave me a comment and you will not only qualify for the Grand Prize for the hop, you will also be entered to win my own personal blog candy... the 6 x 6 Victoria Gardens Paper Pad! When you're done, hop on over to Lori's Blog to check out her amazing project! Here's the hop line up if you get lost along the way:

Cutters Creek Blog (Chris)
Mandie's Blog - You are Here!
Lori's Blog
Deanna's Blog
Mindy's Blog
Laura's Blog
Melissa's Blog
Kim's Blog

Thursday, September 22, 2011

Echo Park Cool Cat

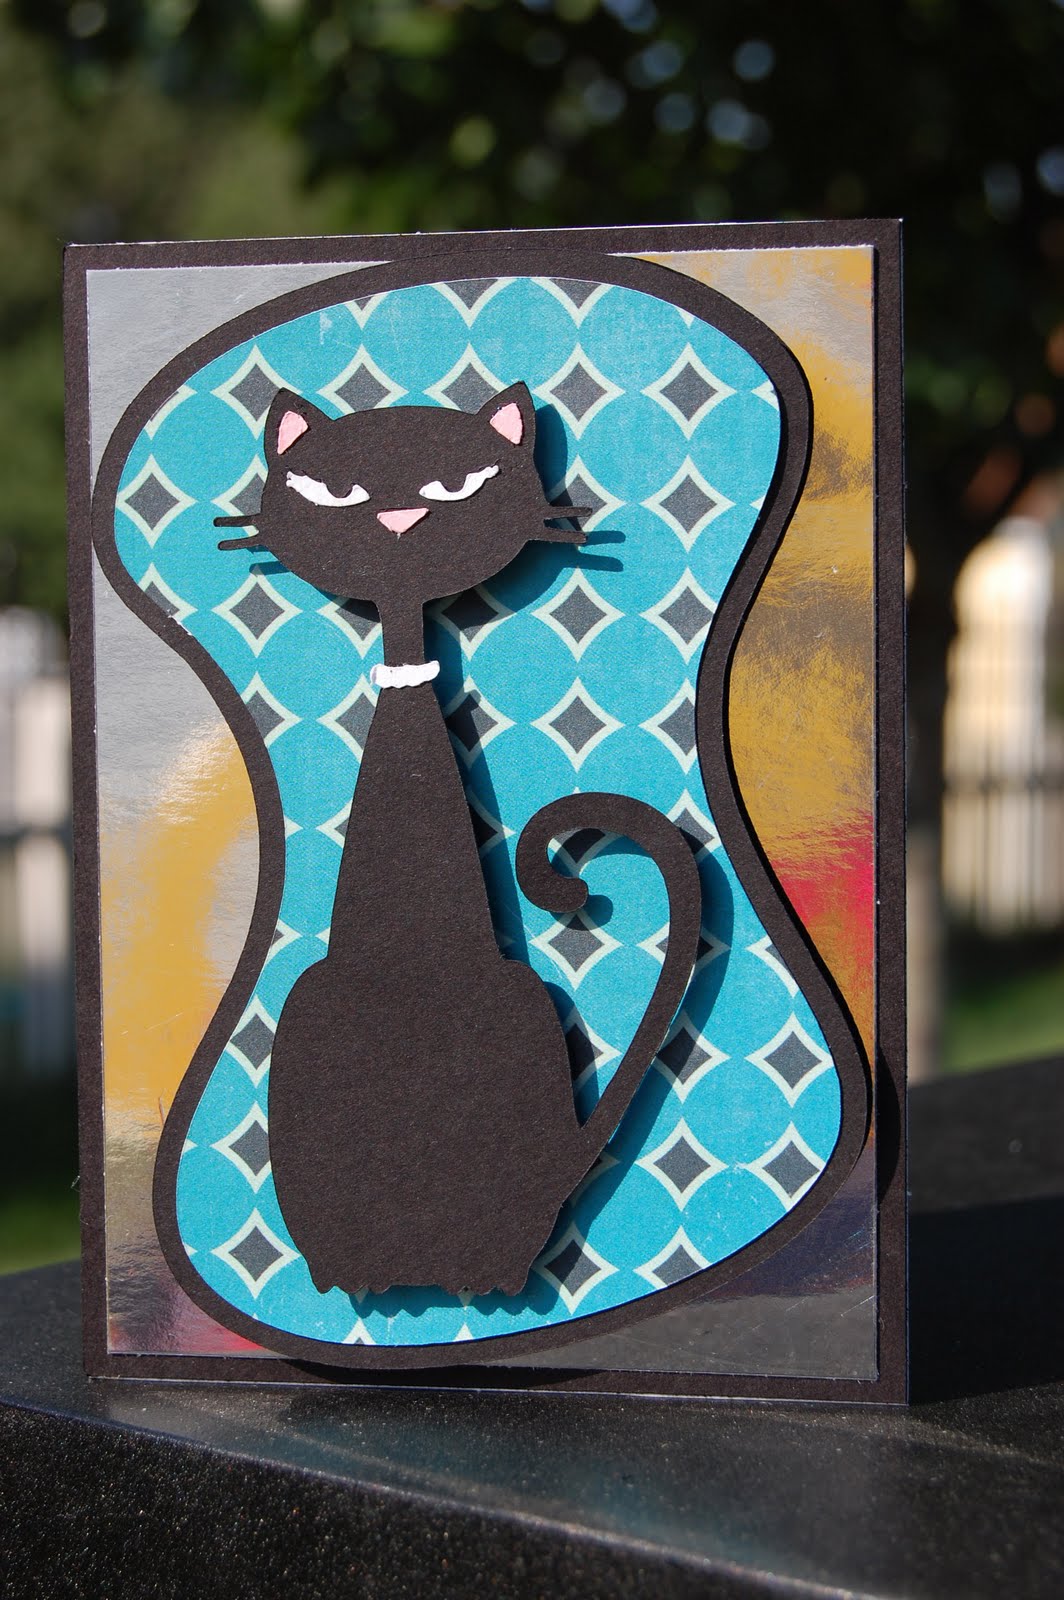
Today I have a quick and easy card that I made using one of the papers from the Echo Park Papers Happy Days Collection!


I love these beautiful papers! The vintage 50's style of these papers is one of my favorites so I grabbed my Nifty Fifty's Cricut Cartridge and cut this awesome "Cool Cat" shape. The background paper is a mirror finish paper that I have been hoarding for quite some time!


I think this is a great any occasion card and I'm planning on creating a few more to put together as a gift set for some one special!

Come back tomorrow to check out the FABULOUS Cutters Creek Blog Hop! All of the designers have made some great projects using Echo Park Papers! Rumor has it there may be prizes involved...