When my friend told me she was naming her baby Maveryk I knew I would have to create him some epic onesies! This one is one of the ones that I've made so far!
I found a few images that I liked and created the aviator glasses hanging on the front of the onesie. Then I used the Top Gun logo for inspiration to create the "danger zone" on the bottom of the back and I had to personalize it with his name too! No off the rack clothes for this little guy when Aunt Mandie is here with her Cricut and HTV!
Monday, October 16, 2017
Monday, October 9, 2017
Yarn Pumpkins
Just a quick post today to share these ADORABLE yarn pumpkins! I love how each one is just a bit different from the other, but they all look cute together!
The pumpkin on the right was made from a heavier weight yarn and I made a pom pom for the base, just wrapping the yarn around two of my fingers spread slightly apart (so you can slide the yarn off at the end) about 25 times. Then I carefully slid the yarn off of my fingers and tied a piece of yarn, about 6" long, around the whole bundle in the center. Then I cut all of the loops and then snipped and shaped until I was happy with my pom pom. Then I twirled each end of a folded in half pipe cleaner around a pencil to make the tendrils. Finally I hot glued the tendril and a cork to the pom pom and I've got a cute little pumpkin!
For the other 2 pumpkins I simply created a yarn ball out of 2 different orange yarns. The one in the middle is the same yarn as the pom pom and the one on the left was a finer yarn. I just wrapped the yarn in a ball shape until I had a good size. Then I used a length of yarn to sew up from the bottom, loop around the pipe cleaner tendril and then back down though the ball. I pulled tight to get a more pumpkin shape to it. Finally I hot glued on the cork and I was done! I also added a dab of glue to the knot and the tail of the ball, which I tucked in next to the knot.
You could easily create a whole pumpkin patch of these adorable little pumpkins!
The pumpkin on the right was made from a heavier weight yarn and I made a pom pom for the base, just wrapping the yarn around two of my fingers spread slightly apart (so you can slide the yarn off at the end) about 25 times. Then I carefully slid the yarn off of my fingers and tied a piece of yarn, about 6" long, around the whole bundle in the center. Then I cut all of the loops and then snipped and shaped until I was happy with my pom pom. Then I twirled each end of a folded in half pipe cleaner around a pencil to make the tendrils. Finally I hot glued the tendril and a cork to the pom pom and I've got a cute little pumpkin!
For the other 2 pumpkins I simply created a yarn ball out of 2 different orange yarns. The one in the middle is the same yarn as the pom pom and the one on the left was a finer yarn. I just wrapped the yarn in a ball shape until I had a good size. Then I used a length of yarn to sew up from the bottom, loop around the pipe cleaner tendril and then back down though the ball. I pulled tight to get a more pumpkin shape to it. Finally I hot glued on the cork and I was done! I also added a dab of glue to the knot and the tail of the ball, which I tucked in next to the knot.
You could easily create a whole pumpkin patch of these adorable little pumpkins!
Monday, October 2, 2017
I'm Back with Fall Floral Projects
So I took a bit of time off from blogging. I had 2 kids, started getting involved with Girl Scouts, PTO, MOPS our local Woman's Club plus working for a craft store as an instructor... so I really didn't have time to craft AND blog about it! But now I should have a little more time, not because I'm doing less, I've decided I need to take back ME. And a huge part of ME is my love of all things crafty. So I've decided, all the fun Girl Scout crafts, stuff I make for myself and for gifts and just... whatever, I'm gonna spend a few minutes each week sharing! I'm also a bit Disney Obsessed so don't be surprised when I start sharing some of the pages from my Disney album!
Today I've decided a couple of pieces that I created while at work!
This is a Fall Wreath that I created for our Wreath Making Class. I just loved the little glass bead corn cobs so much I had to work them into this wreath.
I think this Pumpkin was my favorite project this fall! It's just a small dark teal colored foam pumpkin. The secret to this beauty is, I found a bouquet of flowers that I really liked in the floral bushes and cut it apart and glued it into my pumpkin. It's a quick easy way to create a well thought out design without a ton of time and effort!
Finally this pumpkin was created to look like the one in the class brochure. It's a really pretty combination of stems. This was quite a large piece, this pumpkin was one of the 14" Princess Pumpkins and makes quite a statement piece for a dining table because it sits low enough to talk to each other over!
I look forward to blogging more over the coming months!
Today I've decided a couple of pieces that I created while at work!
This is a Fall Wreath that I created for our Wreath Making Class. I just loved the little glass bead corn cobs so much I had to work them into this wreath.
I think this Pumpkin was my favorite project this fall! It's just a small dark teal colored foam pumpkin. The secret to this beauty is, I found a bouquet of flowers that I really liked in the floral bushes and cut it apart and glued it into my pumpkin. It's a quick easy way to create a well thought out design without a ton of time and effort!
Finally this pumpkin was created to look like the one in the class brochure. It's a really pretty combination of stems. This was quite a large piece, this pumpkin was one of the 14" Princess Pumpkins and makes quite a statement piece for a dining table because it sits low enough to talk to each other over!
I look forward to blogging more over the coming months!
Friday, February 14, 2014
Happy Birthday Butterfly Card
Hello! I've got another card in my butterfly series for you today! For this card I used the retired Butterfly Wings stamp set from Close to My Heart. They have some beautiful sets in the current catalog though, and you can check them out right HERE!
For this card I added my butterflies to the background of my card by stamping all over my patterned paper. To do this and look "natural" make sure you stamp off the edge of the paper. Then I embossed my "Happy Birthday" which is also a retired Close to My Heart set, with clear embossing powder and blinged up the edges a bit. I mounted my sentiment with Foam Adhesive to really make it pop! I also inked all of my edges with Tim Holtz Distress inks!
Make sure you check out my other beautiful butterfly cards. Watch for my post on Sunday, February 16th on the Spellbinders Blog!
Supplies Used:
Close to My Heart Stamps
Recollections Card Bases
Recollections White and Kraft Cardstock
Recollections Adhesive Cork Sheet
Recollections Bling on a Roll
Lawn Fawn Patterned Paper
Tim Holtz Distress Ink: Broken China, Peeled Paint, Vintage Photo
Recollections Foam Adhesive
Scotch ATG tape
For this card I added my butterflies to the background of my card by stamping all over my patterned paper. To do this and look "natural" make sure you stamp off the edge of the paper. Then I embossed my "Happy Birthday" which is also a retired Close to My Heart set, with clear embossing powder and blinged up the edges a bit. I mounted my sentiment with Foam Adhesive to really make it pop! I also inked all of my edges with Tim Holtz Distress inks!
Make sure you check out my other beautiful butterfly cards. Watch for my post on Sunday, February 16th on the Spellbinders Blog!
Supplies Used:
Close to My Heart Stamps
Recollections Card Bases
Recollections White and Kraft Cardstock
Recollections Adhesive Cork Sheet
Recollections Bling on a Roll
Lawn Fawn Patterned Paper
Tim Holtz Distress Ink: Broken China, Peeled Paint, Vintage Photo
Recollections Foam Adhesive
Scotch ATG tape
Wednesday, February 12, 2014
Butterfly Wings Card
Good Morning! Today I've got another Spring-y Butterfly Card for you. I love the detailsof this butterfly. It is from the Butterfly Wings set from Close to My Heart. It's now retired but you can find some other really cool sets in the current Close to My Heart catalog, just click HERE to shop!
For this card, I stamped and my image onto my white background and then again on my green patterned paper. Then I used my detail scissors to cut out the wings from the green paper and adhered them in place on the white background. I love this trick to quickly "color" images! I used ink and a makeup sponge to distress all of my edges. I used a strip of cork across the middle of the card and then decided to add a little bling to make it pop! For a list of supplies, see below:
- Close to My Heart Butterfly Wishes Stamp Set
- Recollections Bling on A Roll
- Recollections White and Kraft Cardstock
- Recollections Adhesive Cork Sheet
- Lawn Fawn Patterned Paper
- Recollections Card Bases
- Tim Holtz Broken China and Vintage Photo Distress Inks
- Sakura Quickie Glue Pen
- Scotch ATG Adhesive
Monday, February 3, 2014
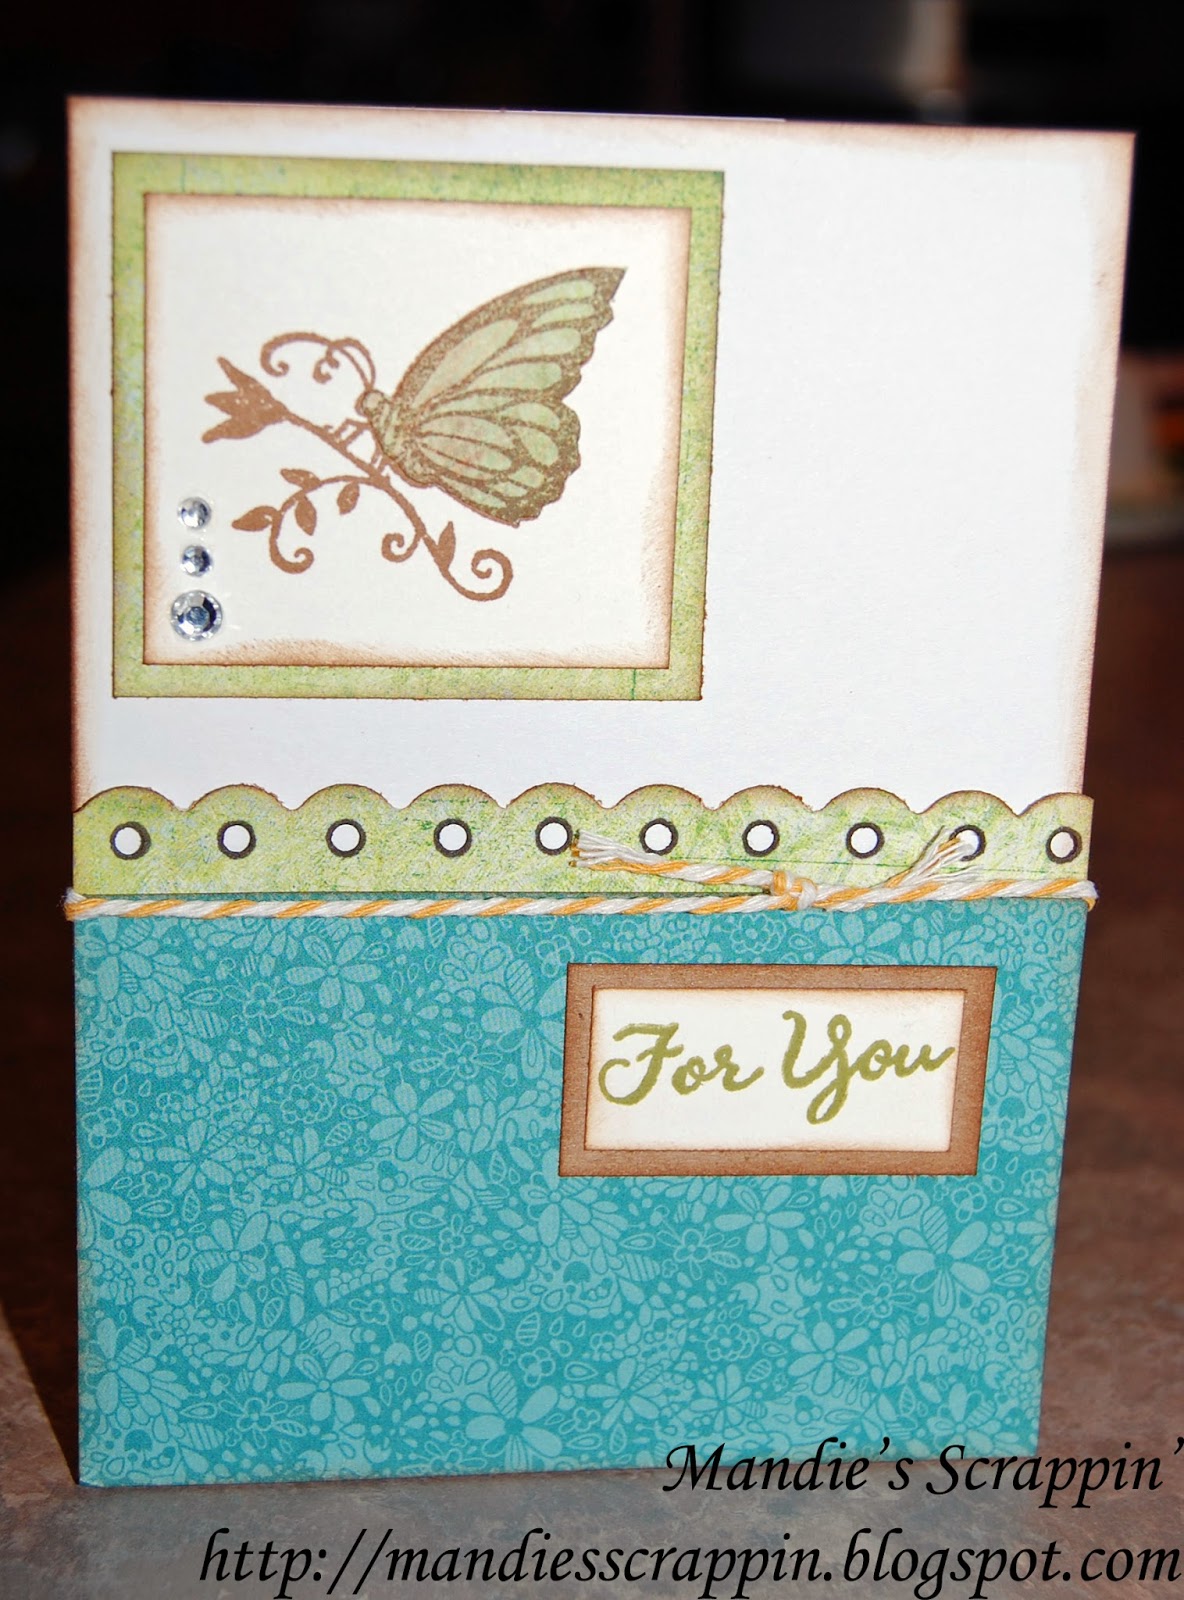
For You Butterfly Card
Hello and welcome to my blog! This is the 2nd card in my recent Butterfly Card series! If you missed the first one, just hop back to the last post and check it out. I was inspired to make this card by one I saw on Pinterest so I decided to make it pretty and spring-y!
This butterfly image is from the same Close to My Heart set as the big butterfly on my last card. It is now retired but CTMH has many awesome stamps to choose from! Bugs & Hugs is a fun set that would be a great substitute and if you're interested in purchasing that or any other Close to My Heart items, click on the link that says "Mandie From Mandie's Scrappin Sent Me" when you order to let Lori know I sent you.
The "For You" sentiment is also from Close to my Heart. I punched the border with a Fiskars Threading Water Border punch. I also added a bit of May Arts Bakers Twine for texture. The blue and green patterned papers are from Lawn Fawn. To "color" my butterfly, I simply stamped it once on the White paper and again on a scrap of my Green patterned paper. Then I "fussy cut" the wings and body from the green paper and adhered it over my image on the white paper. I distressed everything with some Tim Holtz Distress Ink to finish it off.
I hope you enjoyed today's card and I hope I'll see you again soon!
This butterfly image is from the same Close to My Heart set as the big butterfly on my last card. It is now retired but CTMH has many awesome stamps to choose from! Bugs & Hugs is a fun set that would be a great substitute and if you're interested in purchasing that or any other Close to My Heart items, click on the link that says "Mandie From Mandie's Scrappin Sent Me" when you order to let Lori know I sent you.
The "For You" sentiment is also from Close to my Heart. I punched the border with a Fiskars Threading Water Border punch. I also added a bit of May Arts Bakers Twine for texture. The blue and green patterned papers are from Lawn Fawn. To "color" my butterfly, I simply stamped it once on the White paper and again on a scrap of my Green patterned paper. Then I "fussy cut" the wings and body from the green paper and adhered it over my image on the white paper. I distressed everything with some Tim Holtz Distress Ink to finish it off.
I hope you enjoyed today's card and I hope I'll see you again soon!
Saturday, February 1, 2014
Bold Butterfly Card
Hello and welcome to my happy, scrappy blog! I've got a fun-tastic card to share with you today. With all of the cold weather here in IL I've been longing for Spring and happy things, like butterflies! So I've created a series of beautiful butterfly cards to share here on my blog! I'll be featuring all of them over the next week or so.
Today's card uses a big butterfly stamp from Close to My Heart. I stamped it using Tim Holtz Broken China Distress ink. Then I used Clear Embossing powder to emboss it and make it shine! Then I distressed all of my edges with Walnut Stain Distress Ink. The green patterned paper is from a Lawn Fawn 6 x 6 paper pad. You know, they have adorable stamps but did you know they also have fabulous paper too?
Oh, and speaking of Close to My Heart, if you're interested in any of their awesome products, click right HERE to go shopping and find some beautiful new stamps!
I hope you enjoyed the 1st of my 5 card series! See you again real soon!
Today's card uses a big butterfly stamp from Close to My Heart. I stamped it using Tim Holtz Broken China Distress ink. Then I used Clear Embossing powder to emboss it and make it shine! Then I distressed all of my edges with Walnut Stain Distress Ink. The green patterned paper is from a Lawn Fawn 6 x 6 paper pad. You know, they have adorable stamps but did you know they also have fabulous paper too?
Oh, and speaking of Close to My Heart, if you're interested in any of their awesome products, click right HERE to go shopping and find some beautiful new stamps!
I hope you enjoyed the 1st of my 5 card series! See you again real soon!
Subscribe to:
Posts (Atom)