Background

Pages

Monday, January 3, 2011

Cricut Circle Weekly Challenge #14: Getting In Shape!

According to polls, “getting in shape” is among the Top Ten Resolutions people make each New Year’s Eve. Let’s do it! Let’s start the New Year off right by getting in shape . . . a shape other than a rectangle.

This week's Cricut Circle challenge is to create a project in a shape other than a square or rectangle. The project must also include 2 Cricut Cuts from any cartridge, a number somewhere and bling of some kind (to go along with this week’s theme of “Blinging in the New Year”! So of course I made a CROWN!


The crown is cut from the Once Upon a Princess Cricut cartridge. I used an 8 1/2" x 11" sheet of paper and used "Fit To Page" on the Cricut Expression machine to get the largest size possible. If I remember right it cut at 3 3/4". Then I turned off the Fit To Page function and set my dial to the correct size and cut the back of the crown. I was able to just turn the mat around to cut the back, I didn't need to add another sheet of paper.


Now one of the elements of the challenge was to add some bling. When I hear "BLING" I immediately think of American Crafts Glitter Cardstock and Stickles! For liner of the crown I grabbed my Silver Stickles and painted them onto the sheet of gray cardstock that also cut from the Once Upon A Princess Cricut Cartridge.


Then I cut the numbers 2011 from the Birthday Bash Cricut cartridge from Silver American Crafts Glitter Paper. The BEST part about this paper is how thick it is. I didn't need to cut the numbers out of chipboard or something first. I just used Multi-Cut 3, Pressure Max and Blade Depth 6 on my Cricut Expression Machine and it cut beautifully. Then I used my i-rock tool to add the rhinestones.


Next I twisted some silver pipe cleaners around my pencil to curl them and then hot glued them to my numbers and the crown. To finish it off I added pipe cleaner trim to the bottom of my crown! Then I grabbed my two adorable daughters to model it for me! The baby liked holding it but wasn't keen about actually wearing it. The 4 year old Fancy Nancy wannabe LOVED it and has since laid claim to it. Glad I was able to get a few pics of it before it disappeared!


Cutters Creek Shopping List:
Cricut Expression Machine
Silver American Crafts Glitter Paper
Silver Stickles

Sunday, January 2, 2011

Happy New Year!

Wow! I can't believe how fast Christmas and New Year's flew by! I have been trying to craft like crazy but actually got more cleaning of my scraproom done than anything else! It's far from clean but.... at least I can see part of my desk top!

I was lucky enough to get a few samples of the new Action Wobbles that will be released to stores soon. I haven't figured out how to download videos from my phone to my computer yet but as soon as I do I will post a video of this card in action! For now, here's a photo:


I cut this adorable lamb from the Create a Critter Cricut Cartridge. Then I used some fabulous Imaginisce papers, my i-rock, a Martha Stewart border punch and my Pink By Design Country Life stamp set to put together this card! I embossed the white layer with my D'Vine Swirl Cuttlebug folder. Instead of adding Pop Dots to my lamb like I normally would I decided to add the wobble feature. It's like a little spring and the lamp jiggles around! I will seriously try to figure out the video stuff ASAP! I can't wait until I can get a bigger pack of the Action Wobbles!!!!

Friday, December 24, 2010

I'm about 2 years behind in my scrapbooking and photo printing right now, I'm sure others are in the same boat! But the magic of Christmas morning can surely be seen in the photos so I wanted to create a layout to reflect that. The patterned papers I chose are by Echo Park from the Merry Christmas line.


I used my Tim Holtz Walnut Stain Distress Ink around the edges of all of my paper pieces and photo mats. Then I used my Create A Critter Cricut cartridge to cut the strands of Christmas Lights at 1". I was initially going to use my American Crafts Glitter Cardstock for the light bulbs but after the silver cut very nicely for me, I decided to use my Gypsy to remove the "shine" from the light bulbs. For some reason, even on Multi Cut 3 it didn't want to cut all the way through my paper. My Cricut doesn't seem to press as hard with the Gypsy connected but I will be experimenting more in the future with some larger cuts. So I opted for plan B! I cut the remaining bulbs from plain white card stock and after gluing them down I used my Christmas Red, Holly and Gold Stickles to color the remaining bulbs.


Next I created the "Christmas Morning" title with my Gypsy and the Nursery Rhymes Cricut Cartridge. Basically I just nudged and welded the letters together so you could easily recreate this title without a Gypsy. Then I used a little more Tim Holtz Walnut Stain Distress Ink to distress the letters a bit. Next I cut the present from the Christmas Cheer Cricut cartridge at 1 3/4". I used more Gold Stickles on my bow. To hide my journaling I made a little pocket from my scraps. I just rounded the corners with my Corner Chomper and scored it with my Scor Pal for the fold. I wrote my journaling and then accordion folded it to fit in my folder. Then I used a red photo turn to keep it closed. So remember to take lots of photos during the excitement tomorrow morning!

Cutters Creek Shopping List
Tim Holtz Walnut Stain Distress Ink
Create A Critter Cricut cartridge
Nursery Rhymes Cricut Cartridge
Christmas Cheer Cricut cartridge
American Crafts Glitter Cardstock
Stickles:
Christmas Red
Holly
Gold
Corner Chomper
Scor Pal

Tuesday, December 21, 2010

Cricut Circle December Monthly Challenge: Holiday Gifts

Yep! I'm actually getting a project done BEFORE the last minute! The theme for this month’s challenge is geared towards helping us cross off one of the names on our holiday gift list! The challenge is to please create a Holiday Gift Item. The project must be newly created for this challenge and should include the following elements to qualify: use a tag made with a cartridge (there are so many great tags on so many cartridges), use the color red somewhere, use ribbon, and use the Phrase Feature from one of the cartridges. This is what I created:


It's a hair bow holder for my 4 1/2 year old daughter, Penny! What's funny is that this started as just a wall hanging. I started by cutting the ballerina at 7" with the Twinkle Toes cartridge. I really want to get some Peachy Keen stamps for the faces on these characters. I actually backed the eyes with white and added the details myself. I knew I wanted to use ribbon on the skirt and since one of the requirements I found this fun red Christmas ribbon. I love the fur! I almost pulled the wire out of it but then realized I could make pleats in the skirt by accordion folding my ribbon! This project was full of revelations!


I had already cut the skirt, shoes and bows from red card stock but once I added the ribbon skirt layer the red looked kind of dull. Well, what better way to brighten things up then by adding GLITTER? I grabbed my Christmas Red Stickles and carefully added it to the shoes and bows. I also ended up just leaving the red skirt layer off and trimming the brown base a bit so the skirt would sit right. I used some Helmar Liquid Scrap Dots to attach the skirt. This glue holds its shape kind of like hot glue and it was perfect for attaching the skirt. Once the Stickles and Scrap Dots were dry I wanted to add a little more bling to my little girt so I pulled out my trusty i-rock from Imaginisce! This is SERIOUSLY one of my favorite tools, it's right up there with my Cricut! I added large jewels to both bows and then added a little sparkle to her eyes with tiny crystals. For the background I cut the beveled tag from the Tags, Bags, Boxes and More cartridge (TBBM) at 7 1/2" tall from some chipboard. I covered it with a pretty sheet of patterned paper from Crate Paper and then inked the edges with some Walnut Stain Tim Holtz Distress Ink. I also covered the back with plain brown card stock to finish it off.


Next I cut the banner from another piece of chipboard and covered it with more patterned paper and inked the edges. I also used a piece of scrap paper so that I could ink the shadow onto the banner. The phrase "I {heart} Dance" is also on the Twinkle Toes cartridge. The word heart actually prints to attach to the heart but I skipped that in favor of blinging out my heart with glitter! I also used some Pop Up Dots to attach the heart to the banner for even more dimension. Then I used the same Pop Up Dots to adhere the ballerina to the tag and then used some Scotch Quick Dry glue to attach the banner to the bottom. It was at that point that Penny comes over to my desk and tells me that she needs some ribbon because she has made a new hair bow holder for herself. I had a total "Eureka!" moment and told Penny she was a genius as we decided that the sign I was making would be an AWESOME hair bow holder! So here is a look at the one Penny created:


And here's another look at the one I created! I had so much fun playing with my stash to make this project and I just LOVE the way it all turned out in the end. It's funny but sometimes when we have no particular plan we can come up with the coolest stuff!

Thursday, December 16, 2010

Cricut Circle Weekly Challenge #11: Card or Tag Sketch Challenge!

Because we are all so busy this holiday season, they decided to be kind to us over on the Cricut Circle Blog and give us a pretty simple sketch challenge. The only requirement was to use two different cuts and the following sketch:


And here is the cute little card I created! I used my very favorite papers again... Echo Park Paper's Merry Christmas Line. But, if you look close you may notice that I actually used the packaging from my papers! That's right, this paper is to beautiful to waste even a tiny scrap.


I also used my Jolly Holidays Cricut Lite cartridge. This has some of the cutest images on it! I cut my snowman at 4" and the presents are cut at 2". I used some Liquid Applique on his hat. I accidentally scorched it though so I used some Snow Writer to cover it up. It also added the beautiful sparkle!


The phrase "Be Jolly" is from the 3 Birds on Parade cartridge. I'm not a huge bird fanatic or anything but this cartridge has some of the best phrases on it! And they are good page titles too, instead of just card sentiments.


To adhere my snowman I used 2 layers of Pop Up Dots and 1 layer on the presents to give this card some nice dimension. I'm so happy with how this turned out!

Hogs N Kisses Card

Today I want to share a quick card that I made. I'm going to send it to my husband's cousin, Heather, who is away at Boot Camp. She can only receive snail mail and I thought this would make her smile!


I used some American Crafts cardstock and glitter paper, Echo Park patterned paper, the Create a Critter Cricut Cartridge, my new Pink By Design Country Living stamps and, of course, my i-rock to make this fun card! Now to pop it in the mail!

Wednesday, December 15, 2010

Cream City Ribbon Blog Hop Winner

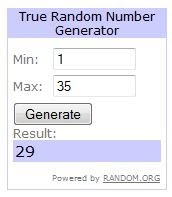
I just realized this afternoon that I never announced the winner of the Cream City Ribbon Blog Hop! The lucky commenter who was selected by Random.org was....


And after some careful counting...


Congrats, Bonnie!!! I sent you a message a few minutes ago. Make sure to send me your info ASAP! Thanks to everyone who checked out our hop!