Hey Everyone! I wanted to take the next few posts to share some of the
fun projects I made while attending this year's Creativation Show.
Creativation is a trade show for the craft and hoddy industry and is a
LOT of fun to attend.
Today's project is one of my absolute FAVORITES from the show! Shh, don't tell the others I said that! This adorable little sock monkey coin purse was made with the amazing new Corduroy Felt! I'm sharing the link so you can check it out too, just click HERE!
Ok, now that you've looked at this awesome felt, back to my project... I cut the brown out for the base by folding my sheet in half and then cutting out the pattern (so you get 2 pieces, one each for the front and back). Then I cut the hat and muzzle from the tan corduroy. The mouth was cut from plain red felt and we cut 3 strips about 1/2" x 12" and then cut those in half for the pom pom. Just tie a piece of thread around the middle of your bundle of felt strips and pull tight. We used hot glue to adhere the layers. Basically, Lay the back piece down with the inside facing you, trace around the outside of the money starting about 1/2" above one ear and going down around the face to the other side right at the edge (leave the top with no glue). Then lay the top piece over it with the corduroy side facing you. Then glue on the hat and muzzle, then the mouth. A dot of glue on top of the hat for the pom pom and finally add some button eyes. To make the closure, you use a hook and look tape dot that already has the adhesive on it.
What a quick and simple project that is simply adorable! Hope to see you again soon for another great project!
Monday, February 26, 2018
Thursday, February 22, 2018
Xyron Creativation Cactus
Hey Everyone! I wanted to take the next few posts to share some of the
fun projects I made while attending this year's Creativation Show.
Creativation is a trade show for the craft and hoddy industry and is a
LOT of fun to attend.
Today's cute craft is this adorable little 3D cactus that was from Xyron. I LOVE their sticker makers and use them frequently in my craft projects. For this one we cut the cactus and pot out of cardstock. The cactus slid together from the top and bottom and there are 4 pieces making up the pot. We simply folded each pot in half, then unfolded it and ran it through the Xyron sticker maker.
Then we just adhere each folded pot to the base of the cactus all the way around. By the way, Beth Kingston (crafter extraordinaire and HSN craft goddess) was teaching this little make and take so I was trying not to go all Fan Girl on her, LOL! Next we used a stapler to add some spines to our cactus arms and finished it off with this adorable paper flower!
This little gem now has a treasured spot on my desk, it was so much fun to create! Check back soon for more Creativation fun!
Monday, February 19, 2018
Lawn Fawn Creativation Card
Hey Everyone! I wanted to take the next few posts to share some of the fun projects I made while attending this year's Creativation Show. Creativation is a trade show for the craft and hoddy industry and is a LOT of fun to attend.
This first project I'd like to share today was from Lawn Fawn Stamps! They have the cutest images, including this adorable set of little birdies. We used Copic Markers to color each of the birds a different color of the rainbow. The image was die cut using a matching die set from Lawn Fawn. Then we just used some foam tape to pop the image up after stamping "So happy for you" on our base cardstock piece. Then we mounted this on a die cut piece of black cardstock as a mat. All of this was adhered to the front of the card over a rainbow striped piece of patterned paper. Such a fun and easy card to make that only takes a few minutes!
Just imagine all the ways you could change this up for different occasions! This one would be great for birthday, graduation, new home, or just anything that needs a little celebration!
Check back soon for another great Creativation project!
Friday, February 16, 2018
Girl Scout Toilet Paper Swap
So the most hated kaper (chore) at Girl Scout camp is cleaning the latrines. Really, the girls don't have it so bad because they really just have to wipe down the seat with gloves on and a Clorox wipe and look for any garbage around the area. So the swap we created for this was the Toilet Paper Roll Swap!
Can you tell what we used to make this? It's a Wooden Spool and White Felt! I cut the felt a little smaller than the width of the spool and it's about 3-4" long. Enough to wrap around the spool once and leave a bit hanging off like TP. I used hot glue for this one to make it a fast project. To finish it off I just added a pin through the felt on top of the roll and it was done!
Can you tell what we used to make this? It's a Wooden Spool and White Felt! I cut the felt a little smaller than the width of the spool and it's about 3-4" long. Enough to wrap around the spool once and leave a bit hanging off like TP. I used hot glue for this one to make it a fast project. To finish it off I just added a pin through the felt on top of the roll and it was done!
Wednesday, February 14, 2018
Girl Scout Bandana Swap
Today I'm sharing another fun swap from Girl Scout Camp. To see the definition of SWAPS, check out my previous post! We used this swap to commemorate our "Clean Up" job kaper (chore) at camp.
I simply cut up bandanas into 3x3" squares, folded them in half to make a triangle and then threaded on a bead to the two ends together. The bead is just a plastic pony bead. Then I added a safety pin and they were done! So easy and quick.
I simply cut up bandanas into 3x3" squares, folded them in half to make a triangle and then threaded on a bead to the two ends together. The bead is just a plastic pony bead. Then I added a safety pin and they were done! So easy and quick.
Monday, February 12, 2018
Girl Scout Camp Swaps - Band Aid Nurse Swap
Today I want to share one of my favorite things - Girl Scout SWAPS! What is a swap exactly? It stands for Special Whatchamacallit Affectionately Pinned Somewhere. So basically, it's some thing small that you can pin to your uniform or SWAPS banner (we have something each year at camp for the girls to save their swaps on).
Today I'm going to share the Nurse Band Aid Swap. This one was super easy. I simply cut beige felt into strips about 3/4" wide by about 2 1/2" long. For camp I usually make about 125 swaps for the girls and adults so you want something very simple. Next, I rounded all the corners to look more band aid like. Next I cut white felt into 3/4" squares. Finally I cut heart shaped felt for the center. I actually used multiple colors here to coordinate with their unit. So the hearts were a rainbow of colors. I glued everything together with Aileen's Tacky Glue. Seriously the BEST for this type of project. It's thicker glue so the felt doesn't absorb it as much. To finish it off, I added a safety pin to attach it!
Today I'm going to share the Nurse Band Aid Swap. This one was super easy. I simply cut beige felt into strips about 3/4" wide by about 2 1/2" long. For camp I usually make about 125 swaps for the girls and adults so you want something very simple. Next, I rounded all the corners to look more band aid like. Next I cut white felt into 3/4" squares. Finally I cut heart shaped felt for the center. I actually used multiple colors here to coordinate with their unit. So the hearts were a rainbow of colors. I glued everything together with Aileen's Tacky Glue. Seriously the BEST for this type of project. It's thicker glue so the felt doesn't absorb it as much. To finish it off, I added a safety pin to attach it!
Saturday, February 10, 2018
Prince Daddy Shirt
Today I've got another fun Disney shirt that I made recently! I used a Teal Glitter Siser HTV for the words and a Purple Glitter Siser HTV for the bow at the top. I will say I absolutely love the way the Glitter Siser sparkles! It's beautiful vinyl.
For the words "Prince" and "Daddy I used the Chocolate Box Decorative font. I LOVE the look of this font and if you zoom in on the photo you can see the delicate cut outs in the letters. It LOOKS amazing but It's not for the faint of heart when weeding out those little cut outs.
Check back again soon for more fun projects!
Thursday, February 8, 2018
Minnie is my Bestie Shirt
Today I'm sharing another fun Disney shirt! This one is for a little girl and reads "Minnie is my Bestie"! I wish my camera could better capture just how glittery this shirt is!
I used Glitter Siser HTV in red and black for this shirt. It has some really amazing sparkle and washes really well too!
I have so much fun creating shirts for Disney Vacations! I have lots more to share coming up soon!
I used Glitter Siser HTV in red and black for this shirt. It has some really amazing sparkle and washes really well too!
I have so much fun creating shirts for Disney Vacations! I have lots more to share coming up soon!
Tuesday, February 6, 2018
Disney Grandma and Papa Shirts
Happily I've been busy creating some awesome new Disney shirts! Now I just need to get some better lighting to photograph shirts... or move to where its sunny in the winter! I used Siser Easyweed Heat Transfer Vinyl to make both of these shirts.
Grandma and Papa are going to look so cute posing with their little Princes and Princesses in front of the castle for their trip!
Custom Disney shirts are so much fun to wear on vacation... or just when you were wishing you were there, like I'm doing now watching the snow come down!
Grandma and Papa are going to look so cute posing with their little Princes and Princesses in front of the castle for their trip!
Custom Disney shirts are so much fun to wear on vacation... or just when you were wishing you were there, like I'm doing now watching the snow come down!
Sunday, February 4, 2018
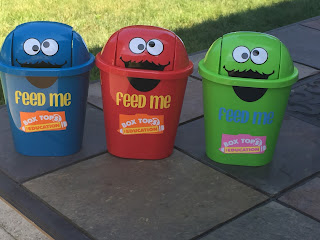
Box Tops for Education Monster Face Collection Cans
Hello again! Today I'm sharing my take on the Box Top Cans I've seen floating around the internet. I found these adorable little cans that make the perfect base for these Monsters!
I created my own files for the monster faces and labels and cut everything from Oracal 651 Vinyl on my Cricut. When applying vinyl to any surface, make sure you've cleaned it with rubbing alcohol for the best adhesion. I made Monsters for both of my daughter's teachers and of course, there's one on my kitchen counter collecting all of our Box Tops too!
I created my own files for the monster faces and labels and cut everything from Oracal 651 Vinyl on my Cricut. When applying vinyl to any surface, make sure you've cleaned it with rubbing alcohol for the best adhesion. I made Monsters for both of my daughter's teachers and of course, there's one on my kitchen counter collecting all of our Box Tops too!
Friday, February 2, 2018
Eeyore Mickey Mouse Ears
Hey Everyone, I'm back with a fun pair of "Mouse Ears" today! Eeyore is my all time favorite character so when I figured out how to make ears I knew I would need a pair of Eeyore Ears! They are purposely oversized because Eeyore is a big guy!
My youngest daughter was nice enough to model the ears for me! I used blue and pink fleece and a bit of black faux fur to represent his tail. These ears are so soft I just love to wear them!
fnmsklnfneklnrfew
My youngest daughter was nice enough to model the ears for me! I used blue and pink fleece and a bit of black faux fur to represent his tail. These ears are so soft I just love to wear them!
fnmsklnfneklnrfew
Subscribe to:
Posts (Atom)


