One of my favorite character meals in Disney World is at Crystal Palace in Magic Kingdom. Not only is the food delicious, I get to see my favorite character - Eeyore!
I used another Scrapbook Generation Sketch for this layout and cut the title with my Cricut. I love that I'm able to weld all of my letters together to create titles like this so easily.
Sunday, April 15, 2018
Friday, April 13, 2018
Disney Tiana Layout with Queen & Co Papers
Today is my youngest daughter's birthday and she's turning 9! So I decided to showcase this layout that I made with the Queen & Co Magic Collection! These photos were taken when she was 4 and she got to meet Princess Tiana at Magic Kingdom. I LOVED they way they interacted so much!
Since Evie was dressed as Rapunzel I decided to use the tower paper on this layout. I used another Scrapbook Generation Sketch for the photo placement but added my own twist to the paper placement. That's why I love sketches so much, you can use as much or as little as you like to make it yours.
Happy Birthday, Evie! Wishing you magic for all the years to come!
Wednesday, April 11, 2018
Spirit of Aloha Disney Scrapbook Layout with Photo Play Paper
Since I had already created a layout of my family enjoying this show, I decided to highlight all of the performers in this layout.
I found this amazing Scrapbook Generation Sketch that combined a ton of full sized 4 x 6" photos with a great collage of my beautiful Photo Play Papers. I again used the Rhapsody collection for this title page, and used my Cricut to write the title on my patterned paper! With a few simple embellishments and a little washi tape this layout came together really quickly!
I found this amazing Scrapbook Generation Sketch that combined a ton of full sized 4 x 6" photos with a great collage of my beautiful Photo Play Papers. I again used the Rhapsody collection for this title page, and used my Cricut to write the title on my patterned paper! With a few simple embellishments and a little washi tape this layout came together really quickly!
Tuesday, April 10, 2018
Child's Desk Makeover
I've always wanted to try a Photo Transfer project but never had the
right project to try it out on. When I got this little desk I decided to
give it a try! I used Plaid Craft's Photo Transfer Medium to turn this
desk into a beautiful display piece that my kids can also use. The wood
desk top was transformed into a usable Chalkboard with Plaid's
Chalkboard Paint. Both the paint and transfer mediums were very easy to
use and made this project a great success!
I started by painting all of the metal pieces of the desk with a spray paint to refresh the metal. I just used plastic shopping bags and painter's tape to mask off the parts I didn't want to spray paint and then used a hammered bronze spray paint. Next I painted the top of the desk with several coats of the Chalkboard
Paint, letting each coat dry fully in between. Once it cured for a few
days I conditioned the paint by rubbing chalk all over it and wiping it
off with a cloth.
Then I made laser copies of my chosen scrapbook paper. This paper is from the Graphic 45 Primary Collection. I've been hording it for several years now so I was excited to use it with out using it all up! Because mine chosen papers had words I had the copies mirrored. I measured the area I was going to put my papers and then cut them down to size.
Next I applied the photo transfer medium in an even coat to the front of my images and then applied them to my desk.
I smoothed down the paper with a scraper tool to make sure it was evenly applied to my surface and wiped away any excess medium. Then I let everything dry for twenty four hours.
The following day I used a damp sponge to wet the paper, then waited 2 minutes and carefully used my sponge to rub the paper off of my image. I repeated for each image I applied.
I let everything dry again and then used sandpaper to distress some of the edges and sections of my transfer (I didn't want it to look too new).Finally I used some watered down brown paint to apply a wash of color to certain areas for an even more aged look.
And here's another angle of the finished desk! I love the way it looks and I'm planning to use it as an end table in my loft! I highly recommend giving Photo Transfer a try, it was so easy to do and gives a beautiful finished result.
Monday, April 9, 2018
Disney Luau Scrapbooking with Photo Play Paper
Here's another Disney Layout that I made with the help of a Scrapbook Generation Sketch and some GORGEOUS papers from the Photo Play Paper Rhapsody Collection. If you haven't checked out Photo Play Paper yet, take a minute to visit their website HERE and check out all of their amazing collections.
I loved the colors on the Rhapsody Collection with my photos that I took of my girls at the Spirit of Aloha Dinner Show at Disney's Polynesian Resort. The food there was amazing and even though it rained the show still went on. We had a fantastic time!
I loved the colors on the Rhapsody Collection with my photos that I took of my girls at the Spirit of Aloha Dinner Show at Disney's Polynesian Resort. The food there was amazing and even though it rained the show still went on. We had a fantastic time!
Sunday, April 8, 2018
Beauty and the Beast Live on Stage Layout
Today I've got another Disney Trip Layout to share! This was another one that came together really quickly with the help of a Scrapbook Generation Sketch and some Jolees Stickers.
Beauty and the Beast is my favorite Disney Princess movie so I LOVED the stage show. I took about a million pictures of it, but managed to narrow the show down to my top 8 (it was HARD). I tried to find ones to showcase the plot as much as I could. I used a pretty simple pattern for the background to really highlight my photos. I also found this tickets die cut that I had in my stash and they were a perfect accent along with the Beauty and the Beast Jolees Stickers. For the title I put the sticker onto a white piece of cardstock and fussy cut around it. Then I added a little foam adhesive under it to pop it up like the layered Beauty and the Beast Image sticker.
Beauty and the Beast is my favorite Disney Princess movie so I LOVED the stage show. I took about a million pictures of it, but managed to narrow the show down to my top 8 (it was HARD). I tried to find ones to showcase the plot as much as I could. I used a pretty simple pattern for the background to really highlight my photos. I also found this tickets die cut that I had in my stash and they were a perfect accent along with the Beauty and the Beast Jolees Stickers. For the title I put the sticker onto a white piece of cardstock and fussy cut around it. Then I added a little foam adhesive under it to pop it up like the layered Beauty and the Beast Image sticker.
Saturday, April 7, 2018
Quick and Beautiful Coasters with Mod Podge
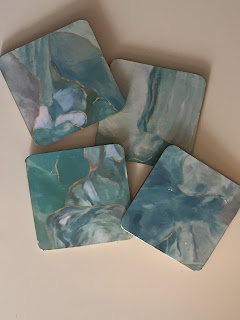
So today I decided to post one of my daughter's crafty projects on my blog. She loves crafting as much as I do and she's always happy when I let her use all of my fun crafty stuff. So we were chatting and she asks me the best way to add some paper to these wood blanks that she bought and of course I said Mod Podge!
So she got out the Mod Podge, the Mod Podge brushes, wood tiles, scrapbook paper and a gold paint pen.
First she applied the Mod Podge in a nice even layer over the wood tile and then applied her paper over the top side. She cut the paper to be slightly larger than the tile to make sure that it covered the whole thing.
Once they were dry, she trimmed the excess paper away with scissors and then used a good old fashioned nail file to sand away any excess paper around the edges and corners.
Because she wanted to use these as functional coasters, we decided she should use some Outdoor Mod Podge over the top of them to seal and protect them. The final step was to use the gold paint marker around the edges of the tiles to give them a great finished look!
So here's the set of 4 coasters she created! They are beautiful and functional! It's amazing what kids will come up with when they are given the right tools to work with!
Thursday, April 5, 2018
Hurray for Hollywood Layout
Today I'm sharing another layout from my Disney Scrapbook. I was again inspired by a Scrapbook Generation Sketch. I highly recommend their sketchbooks (and I'm not paid to say that, I'm just a HUGE fun)!
I used my Cricut to cut the circles and star and then I cut the title from permanent vinyl. The vinyl can be cut a bit easier than cardstock for a cut this delicate, and the title transferred easily with transfer tape.
I used my Cricut to cut the circles and star and then I cut the title from permanent vinyl. The vinyl can be cut a bit easier than cardstock for a cut this delicate, and the title transferred easily with transfer tape.
Tuesday, April 3, 2018
Scrapbooking Disney - Hollywood Studios Layout
The first one I completed was the fun Hollywood Studios Layout! The background and banners were made with scraps I've accumulated over the course of scrapping my trip! I had so many narrow strips in the scrapheap that it was simple to put this one together. I was inspired by a Scrapbook Generation Sketch for the placement of everything. I used this fantastic title from Paper Wizard to top it all off. I wish all of my layouts came together this easy!
Sunday, April 1, 2018
Girl Scout Bunny Craft with Plaid Paints
Hello Everyone! Today I want to share a fun and simple craft that I made with my Girl Scout troop! For this project you will need a 2x4 cut into 8" tall pieces, wood heart shapes, wire, wired burlap ribbon and a pretty floral ribbon, a hot glue gun Plaid Crafts Folk Art Paints in white, pink, gray and brown and paint brushes!
Here's a look at the bunnies I created as well! I used 8", 6" and 4" blocks to make this family of bunnies. Such a fun and simple project!
Subscribe to:
Posts (Atom)


